Share "Flooring Project Tips: A Guide for DIYers and Contractors"
Whether you're refreshing a single room or tackling an entire home renovation, flooring is one of the most impactful updates you can make. The right flooring enhances the aesthetic appeal of a space, improves functionality, and even boosts property value. To help contractors and DIY enthusiasts alike, we’ve compiled some essential tips for planning, prepping, and installing flooring. With these insights, you can ensure your next flooring project is smooth, efficient, and successful.
1. Choose the Right Flooring Material
Not all flooring materials are suitable for every space, so choosing wisely is crucial. Consider these factors when selecting your flooring:
- Room Usage: For high-traffic areas like kitchens or hallways, durable materials such as tile or laminate are ideal. In bedrooms or living rooms, softer options like carpet or luxury vinyl plank add comfort.
- Moisture Resistance: For bathrooms, laundry rooms, and basements, select materials that are water-resistant, like tile, vinyl, or waterproof laminate.
- Style and Aesthetics: Your flooring choice should complement your home’s overall design. Whether you prefer rustic hardwood, sleek tile, or modern concrete, there’s a material to fit every taste.
2. Measure Accurately
Accurate measurements are key to ordering the correct amount of material and avoiding costly mistakes. Use a tape measure to calculate the square footage of your space, and don’t forget to account for extra material for cuts, waste, and future repairs (usually about 10-15% more). Double-check your measurements before placing your order to ensure accuracy.
3. Prepare the Subfloor
A solid subfloor is the foundation of any successful flooring project. Before installing your new floor, ensure the subfloor is:
- Clean and Dry: Sweep away dirt and debris, and check for any moisture issues.
- Level: Use a level to identify uneven spots, which can cause problems for many flooring types. Use a leveling compound or sand down high areas to create a smooth surface.
- Repaired: Address any cracks, holes, or weak spots in the subfloor to prevent long-term damage.
4. Gather the Right Tools
Having the proper tools on hand can save time and frustration during your flooring project. While specific tools will vary depending on the type of flooring you’re installing, here are some general items you may need:
- Utility knife
- Tape measure
- Pry bar or floor scraper (for removing old flooring)
- Trowel (for spreading adhesive)
- Spacers (for maintaining even gaps in tile or wood installations)
- Rubber mallet
- Power tools like a jigsaw or circular saw for cuts
- Safety gear, including gloves, goggles, and kneepads
5. Remove Old Flooring Carefully
If you’re replacing old flooring, take your time with the removal process to avoid damaging the subfloor or surrounding walls. Here are some tips for removal:
- Start by removing baseboards to make pulling up old flooring easier.
- Use the appropriate tools for the material: pry bars for hardwood, scrapers for vinyl, or a heat gun for stubborn adhesive.
- Dispose of old flooring materials properly. Some may need to be recycled, while others can be discarded as waste.
6. Plan Your Layout
Before installing, plan out your flooring layout to avoid uneven patterns or awkward cuts. For materials like tile or wood planks, dry-fit a portion of the floor to get a sense of alignment. Start at the most visible wall and work your way out. Always stagger seams for wood or laminate planks to create a natural, aesthetically pleasing look.
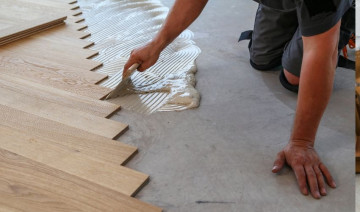
7. Follow Installation Instructions
Every flooring material has specific installation guidelines, so it’s crucial to follow the manufacturer’s instructions. Here are some examples:
- Hardwood Floors: Allow the wood to acclimate to the room’s humidity for several days before installation. Use a nail gun or adhesive depending on the type of wood and subfloor.
- Tile: Use spacers to maintain even grout lines and apply grout once the adhesive has dried. Seal the grout to protect it from moisture and stains.
- Laminate or Vinyl Planks: Many laminate and vinyl planks feature a click-and-lock design, making them relatively easy for DIYers. Be sure to leave a small gap around the edges for expansion.
8. Pay Attention to Finishing Touches
After installation, the final details can make all the difference:
- Trim and Baseboards: Reattach or replace baseboards and trim to cover gaps and complete the look.
- Sealing: Some materials, like wood and tile, may require sealing to protect them from moisture, stains, or scratches.
- Cleaning: Sweep and clean the floor to remove dust and debris, ensuring your new floor looks its best.
9. Consider Professional Help for Complex Projects
While many flooring projects are DIY-friendly, some materials and installations require expertise. For instance, custom tile patterns, radiant heating systems, or intricate hardwood designs may benefit from a professional’s touch. If you’re unsure about your ability to complete a project, don’t hesitate to consult with a contractor.
10. Maintain Your New Floors
Once your flooring is installed, proper maintenance is essential to preserve its beauty and durability. Follow these general care tips:
- Regular Cleaning: Sweep, vacuum, or mop your floors regularly to prevent dirt and debris from causing scratches or wear.
- Protective Measures: Use furniture pads, rugs, and mats in high-traffic areas to reduce wear and tear.
- Specific Care Instructions: Follow the manufacturer’s recommendations for cleaning and maintenance, especially for wood and tile floors.
A Lasting Foundation for Your Home
Installing new flooring is a rewarding project that transforms the look and feel of any space. Whether you’re tackling a small room or outfitting an entire home, planning and preparation are key to success. With these tips in mind, you’ll be well-equipped to complete your flooring project efficiently and beautifully.
Need tools, advice, or supplies for your flooring project? Stop by our store for expert recommendations. Let’s make your next project a success.